
How do I know all this? I learned the hard way years ago, I've had both of these things happen to me. There are still un-watermarked versions of my art floating about out there on the web, and once they're out there, they're out there!
 |
| The World card from the Upcoming Tarot deck Mystical Cats Tarot with Watermark. |
We're just beginning to put images from my upcoming Tarot deck "Mystical Cats Tarot out there, so I needed a new watermark. I thought this would be a perfect opportunity to show you how I do it!
Watermark Tutorial: Photoshop Elements
I use Photoshop Elements to edit my art, it's really close to the same as the full version of Photoshop, not too hard to use, and it's pretty affordable, less that a hundred bucks compared to it's big sister Photoshop (the full version) which is more like a whopping seven hundred! I've used both and believe me, if you're just starting out, get Photoshop Elements! I gave you step by step instructions and screenshots, because we're artists, we're visual, and a picture is worth a thousand words! Click on the images if you need to see them bigger.
- In Photoshop Elements open an image that you want to add a watermark to.

Adding the text, include copyright symbol, your name and website if you have it, or any
other information that you feel is appropriate for the project. - Select the type tool, its on the left and is just a letter "T" Pick a font that is easy to read, if there is an option to make it bold, do it. Now type out whatever you want your watermark to say, it's a good idea to include the copyright symbol, your name, and website if you have one. Ahh, I know, you're asking, How do I get that little © symbol? !" Here's how, hold down the ALT button and while you do type 0169 on your keyboard. It will appear like magic! Are you on a Mac? then hold down the Option button and then type a G.
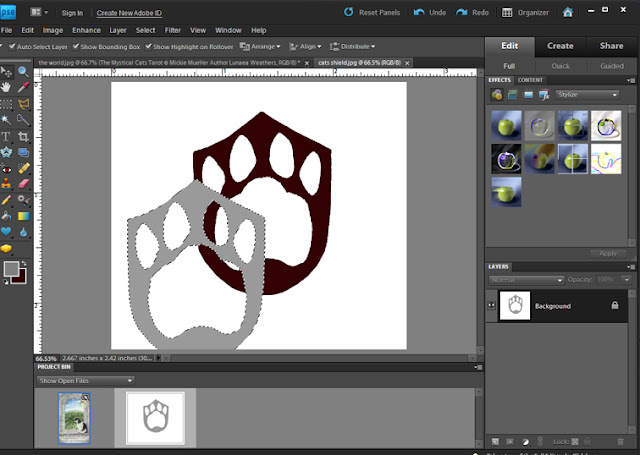
- Now highlight the letters and click on the color swatch on the left hand side, it's that black square. (or whatever color your text is at the time) When you do, a window will pop up that lets you select a color, change it to 50% gray. Make sure "Only Web Colors" is not selected and then enter the values R-128 G-128 B-128, as shown in the picture below. Click OK

Changing the text to gray. - If you want to add a logo, now is the time to do that. If you don't want to add a logo, skip ahead to step 7. I created a logo from one of my sketches of a cat paw shield design from the deck and filled it in with 50% gray just like the letters. Open your logo, use the magic wand tool to select it away from the white background and drag it onto your art.
Select the logo, click and drag using to move tool, just drop it onto the art in the window below. - Now you can re size it using the move tool (the little 4 arrow thing at the top) and drag it around until you have it right where you want it. When it looks just how you want it to, click the green check mark.

Using the move tool, you can re-size and re-position the logo. - Now, on the bottom right you'll now see three layers; your art background, the text layer, and your logo. Holding down the Shift key, click the logo layer and then click the text layer. Now go up to "Layer" at the top of the screen and click it, then click "Merge Layers." Now you have just two layers, the background and the watermark you've just created!
- Now to make it fancy and see-through! You'll see the layers on the bottom right, make sure the text/watermark layer is highlighted in black (it should say Layer 1) and then click Layer at the top of the screen, scroll In the layer styles palette choose "Layer Style" and then "Style Settings" from the drop down menu. Now you'll see a window, click "Bevel" now you can use the slide bar to adjust the bevel until it looks great. This step really helps your watermark stand out. when you're happy with the look, click OK at the bottom of the bevel window.
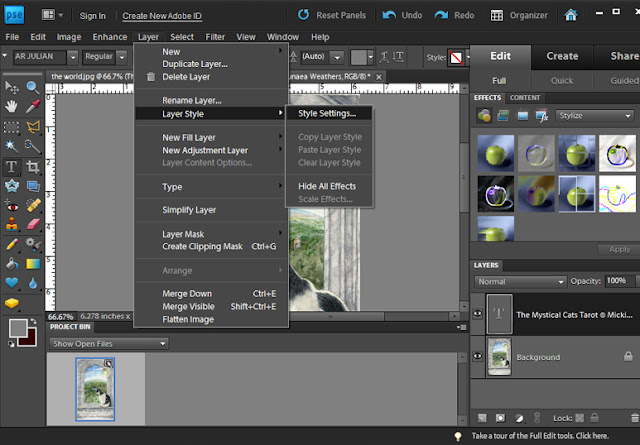
Select Layer, Layer Style, Style Settings, then a window will pop up,
select Bevel, then adjust it however you like. - Now making sure that the watermark layer is selected look right above the layer and you'll see the Opacity bar, click the arrow and adjust how transparent your watermark is. Just play with it until it looks good, you want it to be able to be seen while not distracting from the art too much. You'll find that you might want to adjust the opacity differently for each piece of art.

A close up of the watermark - Congratulations! You just made an awesome looking watermark! Now you need to save it. Delete the art layer (Don't worry, we'll bring it back!) Just left click on the layer to the right. and select "Delete Layer" now grab the Crop tool from the left side and crop around just the watermark. Got to "file" "save as" and save it where you know you can find it again and title it something like "watermark" so it will be easy to find. Be sure to choose the format Photoshop (*.PSD;*.PDD) this will keep it on a transparent layer and make it easy to drag and drop onto anything you want to put it on.

Remove the art layer for now, crop and save as a transparency, PSD file.
Now you can use it again and again! - Now open your art again, and using the move tool grab the watermark and drag it right onto the art. You can move it around, and even re-size it using the move tool. Once you're happy go up to Layer at the top and click "Flatten Image" Then save your art as a JPG. I usually name it by the title with the word "web" at the end so that I know it's the version with the watermark. For this image I called it TheWorldWeb.jpg


I hope you find this tutorial useful as a way to protect your art online and direct fans back to your website!
Happy Art and Blessings!

When will this deck be available? Can't wait!
ReplyDeleteIt's coming out in 2014, I can't wait either!!
ReplyDeletePhoto Watermark does exactly what the name suggests – it lets you add watermarks to photos – but the types of watermarks you can add are quite varied.
ReplyDeleteNot only can you add custom text as a watermark (including changing the font, size and color), you can also use your signature (or any other hand-written text) as a watermark by writing on the screen.
You can also apply stickers, a timestamp, a location, a mosaic effect, or ‘graffiti’ (which basically just lets you go wild on your images with a digital paintbrush). Whether you want to protect your photo or just log when and where it was taken, there should be a tool here to suit.
Photo Watermark is free, but it’s quite heavy on adverts. For $0.99/£0.89 per month you can get rid of them, but unless you’re adding watermarks to a ton of images it’s probably not worth it.
The Great Packaging Ninjas Company (GPNC) is a USA company that manufactures custom and stock corrugated boxes, point-of-purchase displays, digital print and packaging, labels and flexible packaging, folding cartons, and protective packaging. The company also distributes shipping and moving supplies. We make exclusive Custom Candle Boxes in almost all the sizes and shapes you cannot even imagine. We have a wide range of custom sizes available for Candle Packaging Boxes; you have the liberty to choose among all or you can also get your Custom Printed Boxes size just as you want.
ReplyDeleteCBD Bath Bomb Boxes
Custom Kraft Boxes
Custom Soap Boxes
Custom pillow boxes
Custom Sleeve boxes